Setting up a receipt printer involves:
1. Adding the printer to your computer
Choose the type of printer and operating system you use.
TSP100 Mac OS X 10.5 Leopard and later
To install the TSP100 receipt printer on a Mac you can use the TSP100 driver and follow the TSP100 printer installation instructions.
- Plug in the printer to the computer and a power outlet and turn it on.
- Download the Star Micronics Driver.
- Install the downloaded pkg file. You will need to enter your system password to complete the install.
- Open the System Preferences and select Printers and Fax.
- Click + to add a printer. Highlight the TSP100 in the add printers list. When the computer finds the appropriate driver, click Add.
- Go to the section 2. Configuring print settings below to complete the receipt printer setup.
TSP100 ECO: Windows drivers
Download TSP100 Eco drivers for the Star TSP100 Eco receipt printer and follow the instructions for your operating system in the sections below:
Go to the section 2. Configuring print settings below to complete the receipt printer setup.
TSP100: Mac OSX 10.4 (Tiger)
Printing with Mac OSX 10.4 Tiger requires reinstalling the print server.
NOTE: Use this procedure only if you are running MacOS 10.4 Tiger. These steps can damage newer versions.
- Download these files:
- Install the CUPS server. Run cups-1.2.12.dmg and double-click the .pkg file and accept the default settings. You will need to enter the administrator password for the computer.
- Run usbtb-1.0.15.uni.dmg . After it is mounted, double-click usbtb.pkg. If you are asked about searching for USBTB devices, you can cancel or skip that part of the install process. Continue the rest of the process with the default settings.
- Run starcupsdrv-2.5.0.pkg.zip and accept the default settings.
- Reboot your computer.
- When the computer is done loading, turn on your receipt printer.
- From the Apple menu, select System Preferences > Print and fax > + to add a printer.
- In the list of printers, click TSP100 with connection usbtb.
- From the Print Using list, select STAR. Make sure you select STAR with all capitals, and not Star.
- For model, select TSP100 Cutter and click Add.
- Select the TSP100 with the Location set to Directly attached via usb and clear it for the menu column. This printer is automatically added by OSX but will not work. This prevents you from accidentally selecting the incorrect printer.
- If you want to make the receipt printer the default selected printer, change Selected Printer in the Print Dialog to the TSP100.
- Go to the section 2. Configuring print settings below to complete the receipt printer setup.
TSP100: Windows 7
- Before you power on your TSP100 receipt printer, download the drivers and extract them.
- Click Start, right click My Computer and select Properties.
- In System Properties, click Device Manager.
- Power on the TSP100 receipt printer.
- In the Device Manager list, expand Other Devices, right click your printer and select Update Driver Software.
- On the Update Driver Software page, click Browse my computer for driver software.
- Browse to where you downloaded the driver folder and choose the 32 bit or 64 bit folder, depending on the version of Windows 7 you have, and click Next.The printer is now installed and you can configure your printer for use with LightSpeed Retail.
- In Devices and printers, right click the Star printer and select Printing Preferences.
- At the bottom of the Printing Preferences, click Advanced.
- Set the paper size to 72 x Receipt and press OK twice to return to the printer properties window.
- Right click the Star printer and select Printer Properties > Preferences > Advanced and set the paper size to 72 x Receipt and click OK.
- Click Printing Defaults and set the paper size to 72 x Receipt and click OK.
- Click Device Settings:
- set FRICTION to 72 x Receipt
- Page Cut Type and Document Cut Type to Partial Cut
- Cash Drawer One to Open Before Printing (if you have a printer driven cash drawer).
- Keep the first setting for Cash Drawer One - Pulse Width, at its default of 200 milliseconds.
- Newer versions of the drivers may have more installable options on the Device Settings tab.
Choose these options: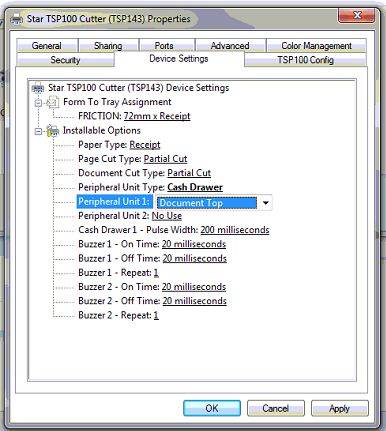
- Go to the section 2. Configuring print settings below to complete the receipt printer setup.
TSP100: Windows 8 and later
- Before you power on your Star TSP100 receipt printer, go to the Star Micronics site,
- for Product Type, select Thermal
- for Printer Family, select TSP100
- for Printer Model, select STAR TSP100ECO
- for Operating System, select Windows 8
- Download the futurePRNT V5.3 Lite (118MB) driver. It can take up to 10 minutes to download.
- Extract the file and run the installer for your 32 or 64-bit OS. Click Next through all the install prompts.
- When the install is complete, plug your printer in.
- Turn it on and see if the computer recognizes it. If it doesn’t go, into Device Manager and install the drivers from there.
- Right click the Desktop and click Personalize > Control Panel Home > View Devices and Printers.
- Right click the Star printer and select Printing Preferences.
- Click Advanced, set the paper size to 72 x Receipt and click OK to return to the printer properties window.
- Right click the Star printer and select Printer Properties.
- Click Preferences, set the paper size to 72 x Receipt and click OK to return to the printer properties window.
- Click Advanced > Printing Defaults, set the paper size to 72 x Receipt and click OK to return to the printer properties window.
- Click Device Settings:
- set FRICTION to 72 x Receipt
- Page Cut Type and Document Cut Type to Partial Cut
- Cash Drawer One to Open Before Printing (if you have a printer driven cash drawer).
- Keep the first setting for Cash Drawer One - Pulse Width, at its default of 200 milliseconds.
NOTE: Newer versions of the drivers may have more installable options on the Device Settings tab. Choose these options:
- Go to the section 2. Configuring print settings below to complete the receipt printer setup.
TSP100LAN: Mac OS X 10.5 and later
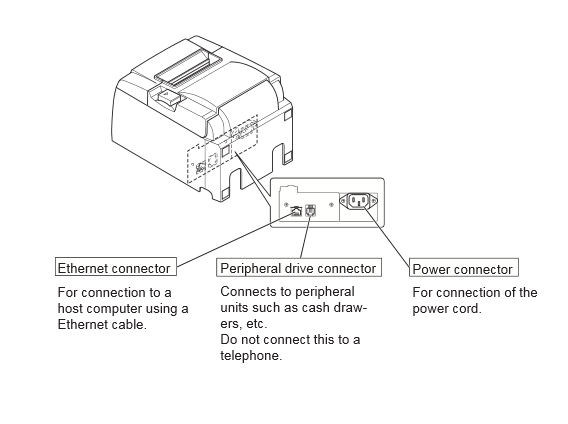
- Connect one end of the ethernet cable into the back of the printer and the other end into your router. Plug the power cord into the printer and wall.
- Hold the feed button and power the printer on while continuing to hold the button until two pages print. Keep the one that says Current IP Parameters near the bottom.
- Get the driver either from online or the installation CD.
To get the driver from the TSP100 LAN installation CD:
- Insert the installation CD and double click the TSP100_V520 CD.
- Open the Mac folder and then the Cups folder.
- Double click starcupsdrv zip and unzip it.
To download the driver from the Internet:
- Go to the Star Micronics site.
- Select Thermal for the Product Type, TSP100 for Printer Family, TSP100LAN for printer model, and Mac OS X for the Operating System.
- Download the Mac OS X CUPS Driver V3.3.0 file.
- Open your downloads folder and click the starcups driver.
- Click the Driver folder and unzip and install the starcups package.
- When the installation is complete, click the Apple menu and go to System Preferences > Print & Fax > + Add new printer > IP.
- In the Address field enter the IP Address of the LAN printer listed in the Current IP Parameters section you printed.
- From Use, click Select Printer Software and enter Star TSP 100. Select a result that matches and click Add.
- Go to the section 2. Configuring print settings below to complete the receipt printer setup.
TSP100LAN: Windows
- Connect one end of the ethernet cable into the back of the printer and the other end into your router. Plug the power cord into the printer and wall.
- Power the printer on, insert the installation CD and run Autorun.exe.
- If you do not have the installation CD:
- Go to the Star Micronics site.
- Select Thermal for the Product Type, TSP100 for Printer Family, TSP100LAN for printer model, and your OS for the Operating System.
- Download the futurePRNT V5.3 Lite file.
- Right-click the driver file and select Extract All.
- Navigate to the file, click Autorun.exe file, and click Run > Installation and do a typical install.
- When the installation is complete, go to Start > All Programs > Star Micronics > Star TSP100 > Ethernet Setup Tool.
- Click Yes and Search LAN for TSP100LAN.
- If a Windows Firewall notification appears, click Allow Access.
- Click the printer to highlight it and click Add Printer Queue > OK > Complete.
- Go to Start > Devices and Printers. Right click the Star printer and select Printing Preferences.
- Click Advanced button and set the paper size to 72 x Receipt. Click OK to return to the printer properties window.
- Right click the Star printer and select Printer Properties.
- Click Preferences > Advanced and set the paper size to 72 x Receipt. Click OK to return to the printer properties window.
- Click Advanced > Printing Defaults and set the paper size to 72 x Receipt. Click OK to return to the printer properties window.
- Click Device Settings.
- Set FRICTION to 72 x Receipt.
- Set Page Cut Type and Document Cut Type to Partial Cut.
- Set Cash Drawer One to Open Before Printing.
- Leave Cash Drawer One - Pulse Width at 200 milliseconds.
- Newer versions of the drivers may have more installable options on the Device Settings tab. Choose these options:
- Go to the section 2. Configuring print settings below to complete the receipt printer setup.
2. Configuring printer settings
Choose the operating system you use.
Mac page setup in Chrome
Configure these print settings.
If you are having any problems with your settings:
- In Chrome, open the Print dialog box.
- From Paper Size, select Manage Custom Sizes.
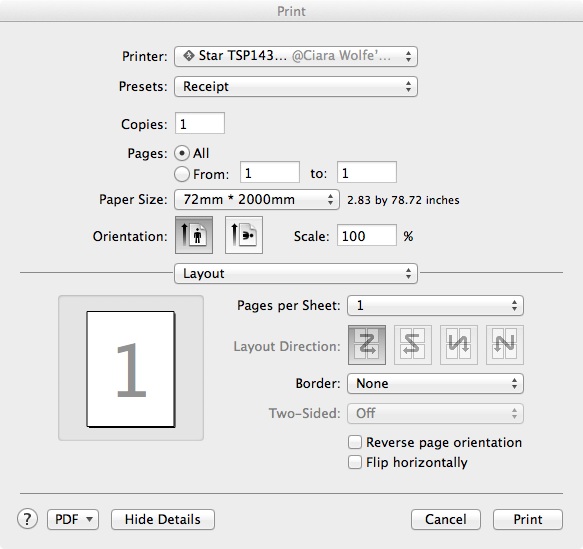
- Click + and change the width, height and margin:
- width: 2.83 inches
- height: 78.72
- non-printable are: user defined, with 0 for left, right, bottom and top.
- Click OK. You can double-click Untitled and rename the settings to something more intuitive, such as Receipt.
- From System Preferences, select Print & Scan and select your printer.
- Change the Default paper size to the name you gave your custom print size.
- Restart your Mac to apply the settings.
Mac page setup in Firefox
NOTE: After you choose these settings, they are maintained in Firefox you must change them when you print to a different printer. For example, if the page setup settings apply to the receipt printer, you must change the settings before printing to a label printer.
- In Firefox, choose File > Page Setup.
- If you are printing to a receipt printer, select TSP143 from Format For and 72mm * 2000mm as the Paper Size. If you are printing to a label printer, select ZD410 from Format For and 2.25" x 1.25" as the Paper Size.
Selecting the printer and settings
When you print a receipt or label in Lightspeed Retail, the Print dialog appears. You must select the printer and settings:
- On the Print dialog, select the receipt printer TSP143 or label printer ZD410 from the Printer list.
- Select the printer preset that you created for use with your printer. You're now ready to print the receipt or label.
Setting printer margins
These settings apply to receipt and label printers.
- In Firefox, enter about:config in the browser's URL field.
- Enter margin in the filter field.
- Ensure that each of the print.print_margin preference option values are set to zero (0). To edit a value, double-click the option and then enter 0 in the popup window.
Creating a printer settings preset
To save time, you can create a printer settings preset to use for printing labels and receipts.
- Open the Firefox Print dialog. The Print dialog opens automatically when printing a receipt or label in Lightspeed Retail, or you can choose File > Print from the Firefox menu.
- Select TSP143 (receipt printer) or ZD410 (label printer) from the Printer list. If you're using both a receipt printer and label printer, you can select either one for this step as the preset will work with both devices.
- If you're using a receipt printer, set the following settings. If your Lightspeed Retail setup includes only label printer, go to the next step.
- Select Printer Features.
- Select Cut Options from the Feature Sets list, and set Document Cut Type and Page Cut Type to Partial Cut.
- Select Cash Drawer Control from the Feature Sets list.
- Select Open Drawer 1 from the Cash Drawer list.
- For both receipt printers and label printers, select Firefox from the third drop-down list, and set all page headers and footers to blank.
- To save the settings as a preset, click Save Current Settings as Preset from the Presets list.
- Enter a descriptive name for the preset, such as Receipt or Label, or if you use both a receipt printer and label printer, the generic Lightspeed Printer. If you use a receipt printer and a label printer, select All Printers for Preset Available For. This ensures that the preset is available when printing to your receipt or label printer. If you're using a receipt printer or label printer only, select Only this printer for the Preset Available For option to link the preset to the printer that is currently selected from the Printer list of the Print dialog. A linked preset is automatically applied when selecting the corresponding printer.
- Click OK.
Windows page setup in Chrome
Make printing work smoothly in Google Chrome by making one preference change.
Set the paper size
-
On the Print dialog box, highlight your receipt printer and click Preferences > Advanced.
- Change the paper type to 72x receipt.
Windows page setup in Firefox
Select File > Page Setup from the Mozilla Firefox menu. If you don't have a menu bar, click the Firefox dropdown, Page Setup will be to the right of Print.
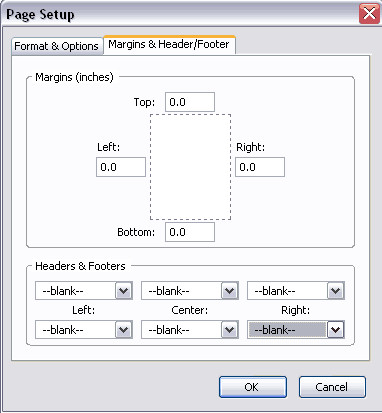
Select the Margin and Header/Footer Tab.
Set all margins to zero and set headers and footers to --blank--.